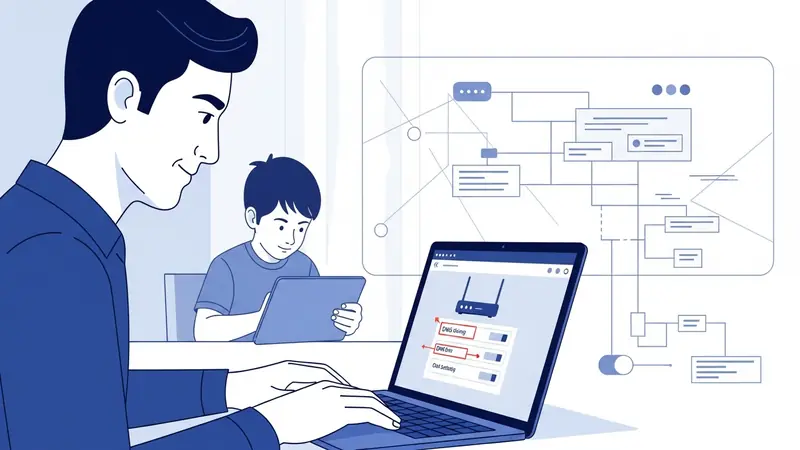
How to Set Up DNS Filtering at Home: Block Adult Content Network-Wide (2026 Parent Guide)
What You’ll Learn (And Why This Matters for Your Family)
Your 10-year-old just got their first tablet. Your teenager has a smartphone they take to their room. Your kids’ friends bring their own devices when they visit. How do you protect all of them without installing parental control software on every single device?
DNS filtering blocks adult content, gambling sites, and other inappropriate material at the network level—before any device in your home can reach those sites. Set it up once on your Wi-Fi router, and every phone, tablet, laptop, and gaming console is protected automatically.
This guide walks you through three DNS filtering options: a free 5-minute setup, a $20/year family-focused service, and a router-level solution that can’t be bypassed by tech-savvy teenagers. By the end, you’ll have network-wide content filtering running, and you’ll know how to verify it’s actually working.
How DNS Filtering Works (The Parent-Friendly Explanation)
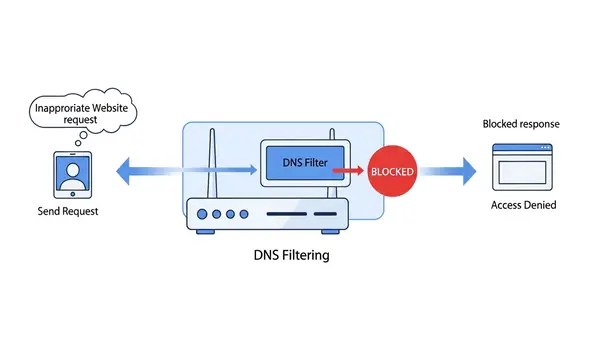
When your kid types “example.com” into their browser, their device asks a DNS server to translate that name into a number (an IP address) so it can connect. Normally, your internet provider handles these requests and returns whatever address is asked for.
DNS filtering intercepts these requests. When a device asks for an adult site, the filtering DNS server either blocks the request entirely or redirects to a “this site is blocked” page. The device never gets the real address, so it can’t load the content.
The advantage: this works on every device connected to your Wi-Fi without installing apps. The limitation: a tech-savvy teenager can potentially bypass it by changing DNS settings on their device (we’ll address that in the router-level setup section).
Prerequisites: What You Need Before Starting
For the basic setup, you need access to your Wi-Fi router’s admin panel. This is usually accessed by typing an address like 192.168.1.1 or 192.168.0.1 into your web browser. If you don’t know your router’s admin password, check the sticker on the router itself or your internet provider’s documentation.
You’ll also need about 15 minutes of uninterrupted time. When you change DNS settings, devices may lose internet access briefly while they refresh their connections. Plan this for a time when your kids aren’t in the middle of online homework or a video call.
If you rent your router from your internet provider and can’t access advanced settings, you have two options: call your provider and ask them to enable advanced settings access, or buy your own router. Most cable internet customers can replace their provider’s router with their own—just verify compatibility first.
Option 1: Free DNS Filtering with Cloudflare for Families (5-Minute Setup)
Cloudflare for Families is a free DNS filtering service that blocks malware and adult content. It’s the fastest way to get basic protection running.
Step 1: Log into your router’s admin panel. The address is usually printed on a sticker on the router itself. Common addresses: 192.168.1.1, 192.168.0.1, or 10.0.0.1. Enter your admin username and password when prompted.
Step 2: Find the DNS settings section. This is usually under “Internet Settings,” “WAN Settings,” or “Network Settings.” The exact location varies by router manufacturer. Look for fields labeled “Primary DNS” and “Secondary DNS.”
Step 3: Replace the existing DNS addresses with Cloudflare’s family-protection DNS servers:
- Primary DNS: 1.1.1.3
- Secondary DNS: 1.0.0.3
These specific addresses enable both malware blocking and adult content filtering. According to Cloudflare’s documentation, these servers block known malicious sites and adult content categories based on regularly updated blocklists.
Step 4: Save the settings and reboot your router. Most routers have a “Save” or “Apply” button, followed by a “Reboot” option. If you don’t see a reboot option, unplug the router for 10 seconds and plug it back in.
Step 5: Wait 2-3 minutes for the router to fully restart. Your devices will automatically reconnect to Wi-Fi and start using the new DNS servers.
Option 2: CleanBrowsing Family Filter ($20/Year for Advanced Control)
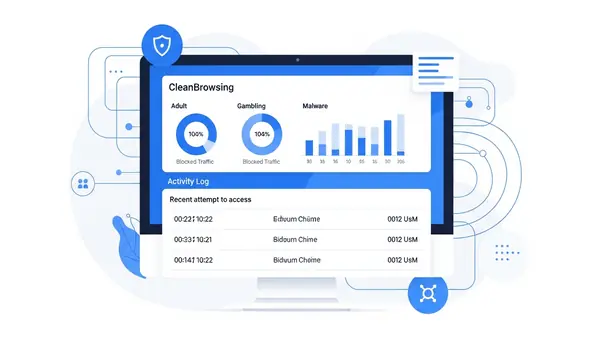
CleanBrowsing offers more granular control than Cloudflare’s free option. The free tier blocks adult content, but the $20/year Family plan adds custom blocklists, filtering reports, and the ability to block specific social media platforms or gaming sites during homework hours.
Step 1: Sign up for a free CleanBrowsing account at cleanbrowsing.org. The free tier works for basic adult content blocking. If you want scheduling (block TikTok from 3-6 PM on weekdays) or activity reports, upgrade to the Family plan.
Step 2: After signup, CleanBrowsing provides you with custom DNS addresses. For the free Family Filter, use these DNS servers:
- Primary DNS: 185.228.168.168
- Secondary DNS: 185.228.169.168
If you subscribe to the paid Family plan, you’ll get custom DNS addresses tied to your account, which enable the scheduling and reporting features.
Step 3: Log into your router (same process as Option 1) and replace the DNS addresses with CleanBrowsing’s servers. Save and reboot.
Step 4: If you’re using the paid plan, log into your CleanBrowsing dashboard to configure custom rules. You can block entire categories (social media, gaming, streaming), set time-based schedules, or add specific domains to your blocklist.
CleanBrowsing’s advantage over Cloudflare: you can see what sites your kids are trying to access in the activity logs. This gives you visibility into what they’re curious about without installing monitoring software on their devices.
Option 3: Router-Level Enforcement (For Tech-Savvy Teenagers)
Here’s the problem with the setups above: a teenager who knows how to Google “how to bypass DNS filtering” can change the DNS settings on their phone or laptop to use Google’s DNS (8.8.8.8) or Cloudflare’s non-filtered DNS (1.1.1.1) instead of your filtered DNS servers.
To prevent this, you need to force all devices to use your chosen DNS servers at the router level. This requires a router that supports DNS redirection or firewall rules. Most consumer routers from Netgear, Asus, or TP-Link support this in their advanced settings.
Step 1: Set up DNS filtering using Option 1 or Option 2 above first.
Step 2: Log into your router’s advanced settings and look for “Firewall,” “Access Control,” or “Port Forwarding” sections.
Step 3: Create a firewall rule that blocks outbound traffic on port 53 (the port used for DNS requests) to any destination except your chosen DNS servers. The exact steps vary by router:
- Asus routers: Go to Firewall > Network Services Filter. Add a rule blocking port 53 for all devices.
- Netgear routers: Go to Security > Block Services. Add DNS (port 53) to the blocked services list.
- TP-Link routers: Go to Access Control > Rule. Create a rule blocking port 53 for all LAN devices.
Step 4: Create an exception rule that allows DNS traffic only to your filtering DNS servers (Cloudflare’s 1.1.1.3 or CleanBrowsing’s 185.228.168.168).
This setup means that even if your teenager manually changes their phone’s DNS to 8.8.8.8, the router will block that traffic. Their device will fall back to the router’s DNS settings, which point to your filtered DNS servers.
Important: Some routers don’t support granular firewall rules like this. If yours doesn’t, consider upgrading to a router that does. The GL.iNet Beryl AX (covered in our Why You Need a Travel Router for Hotels (2026 Guide)) supports advanced DNS enforcement and costs around $90. For families serious about content filtering, it’s worth the investment.
Common Mistakes to Avoid
Mistake 1: Not rebooting devices after changing DNS settings. Your laptop, phone, and smart TV cache DNS settings. After you change DNS on your router, reboot every device or disconnect and reconnect to Wi-Fi. Otherwise, they’ll keep using the old DNS servers for hours.
Mistake 2: Forgetting about mobile data. DNS filtering only works on your home Wi-Fi. When your kid leaves the house and switches to cellular data, they’re no longer protected. For mobile protection, you need device-level parental control software like Qustodio or Bark (separate from DNS filtering).
Mistake 3: Not testing the setup with your kids present. Sit down with your child and explain what you’ve set up and why. Then test it together by trying to access a blocked site. Frame it as protection, not punishment: “I set this up because there’s stuff online I don’t want you stumbling into by accident.”
Mistake 4: Assuming DNS filtering blocks everything. DNS filtering blocks known adult sites based on blocklists. It won’t catch everything—new sites appear daily, and some content sneaks through on platforms like Reddit or Twitter. DNS filtering is one layer of protection, not a complete solution.
Mistake 5: Not setting up router-level enforcement. If you skip the firewall rules in Option 3, your teenager will bypass your filtering within a week. A quick TikTok search for “how to unblock websites at home” will teach them how to change DNS settings on their phone.
How to Verify DNS Filtering Is Working
Don’t assume it’s working—test it. Here’s how:
Test 1: The direct test. On a device connected to your Wi-Fi, try accessing a known adult site. If DNS filtering is working, you should see a block page or a “server not found” error. (Use an obviously adult domain name—I’m not listing examples here, but you know what to test.)
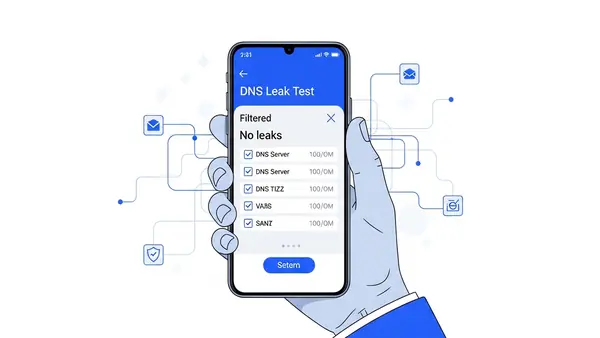
Test 2: The DNS leak test. Visit dnsleaktest.com on a device connected to your Wi-Fi. Click “Extended Test.” The results should show your filtering DNS servers (1.1.1.3 for Cloudflare or 185.228.168.168 for CleanBrowsing). If you see your ISP’s DNS servers or Google’s 8.8.8.8, your devices aren’t using the filtered DNS yet.
Test 3: The bypass test. On your teenager’s phone, manually change the DNS settings to Google’s DNS (8.8.8.8). If you set up router-level enforcement correctly (Option 3), the block should still work even with Google DNS configured. If the block disappears, you need to implement the firewall rules.
Run all three tests before considering the setup complete. If any test fails, go back and verify your router settings.
What DNS Filtering Won’t Protect Against
Be realistic about what this setup does and doesn’t do. DNS filtering blocks access to known adult websites. It does not:
- Block adult content on social media. Instagram, TikTok, and Twitter host user-generated content that DNS filtering can’t block (because you can’t block the entire platform without breaking legitimate use).
- Block VPN apps. If your teenager installs a VPN app, they can route all their traffic through the VPN, bypassing your DNS filtering entirely. You’ll need device-level parental controls to block VPN apps.
- Monitor what your kids are actually doing online. DNS filtering blocks sites—it doesn’t log chat messages, social media DMs, or what videos they’re watching on YouTube. For monitoring, you need software like Bark or mSpy (separate tools).
- Protect devices outside your home. DNS filtering only works on your Wi-Fi. At school, at a friend’s house, or on cellular data, your kids have unfiltered internet access.
Think of DNS filtering as the lock on your front door. It’s essential, but it’s not the only security measure your home needs.
Talking to Your Kids About DNS Filtering
Here’s the conversation I recommend having with your child after you set this up:
“I set up some protection on our Wi-Fi that blocks certain websites. I did this because there’s content online that I don’t think is appropriate for you right now, and I don’t want you stumbling into it by accident. This isn’t about not trusting you—it’s about keeping you safe from stuff that even adults find disturbing.”
“If you try to visit a site and it’s blocked, come talk to me. Sometimes these filters block things by mistake, and we can fix that together. But if you’re trying to get around the filter, that’s going to be a problem, and we’ll need to have a different conversation.”
Frame it as protection, not surveillance. According to the American Academy of Pediatrics, open communication about internet safety is more effective than covert monitoring. Your goal is to create an environment where your kid feels comfortable coming to you when they encounter something uncomfortable online.
Next Steps: Layering Your Family’s Online Protection
DNS filtering is one layer. Here’s what to add next:
Device-level parental controls: Install Qustodio, Bark, or similar software on your kids’ phones and tablets. This adds app blocking, screen time limits, and monitoring for concerning messages or searches. DNS filtering blocks at the network level; parental control software blocks at the device level.
Safe search enforcement: Force Google, YouTube, and Bing to use Safe Search mode. This is separate from DNS filtering and blocks adult content in search results. CleanBrowsing’s paid plan includes Safe Search enforcement; otherwise, you’ll need to configure this manually in each browser.
Router-level VPN blocking: If you’re concerned about your teenager using VPN apps to bypass filtering, configure your router to block common VPN protocols (OpenVPN, WireGuard, IPSec). This requires an advanced router—most consumer routers don’t support protocol-level blocking.
Family tech contract: Sit down with your kids and write out agreed-upon rules for internet use. Include consequences for attempting to bypass protections. Having this conversation upfront prevents the “you’re spying on me” argument later.
For password management across your family’s devices, see our guide to Best Password Managers for Remote Teams (2026 Review) (the same principles apply to families—you need a shared vault for Wi-Fi passwords, streaming logins, etc.).
When to Upgrade to Commercial-Grade Filtering
The free and $20/year options above work for most families. Consider upgrading to enterprise-grade filtering if:
- You have teenagers who are actively trying to bypass protections (you need more sophisticated blocking)
- You want detailed reporting on what sites are being accessed and blocked
- You need to enforce different filtering policies for different devices (strict filtering for the 8-year-old’s tablet, lighter filtering for the 16-year-old’s laptop)
- You run a small business from home and need to separate family filtering from business network access
Commercial options like OpenDNS Home ($20/year) or Circle Home Plus (hardware device, $130) offer these advanced features. For most families, CleanBrowsing’s $20/year Family plan hits the sweet spot between features and complexity.
Final Thoughts: Protection, Not Paranoia
DNS filtering is a practical, set-it-and-forget-it layer of protection for your home network. It won’t catch everything, and it won’t replace having honest conversations with your kids about what they encounter online.
Set it up, test it, explain it to your kids, and then move on to the next layer of protection. The goal isn’t to create a surveillance state in your home—it’s to put reasonable guardrails in place while your kids learn to navigate the internet safely.
Start with Option 1 (Cloudflare’s free filtering) this weekend. It takes 5 minutes, costs nothing, and immediately blocks the most egregious content. Then, as you get more comfortable with the technology, layer in router-level enforcement and device-level parental controls.
Your kids will test the boundaries. That’s normal. When they do, have the conversation about why the protections exist rather than escalating to more invasive monitoring. Trust, combined with reasonable technical protections, is how you raise kids who make good decisions online—even when you’re not watching.